Parts Database
Overview: Rental stores that sell parts generally don't keep one of everything on hand, as it would be too unwieldy; they will keep plenty of air filters and spark plugs, and special order anything unusual. The Point-of-Rental program works the same way where we do not want to maintain Item Records for tens of thousands of part that we may never sell. The Parts database is separate from your Point-of-Rental database and allows you to quickly lookup the information on a part or add the part to you Point-of-Rental database so it can be purchased and sold on Work Order or Repair contract. Previous to 2011, you would have to send a parts file to us so we could import it into your Parts Database (there was a fee for this); in v2011 we created an interface allowing anyone to import or update their Parts Database.
1. The first step is to get the file from the manufacturer or distributor. We recommend using a Comma Delimited or Tab Delimited file (with a .csv or .txt extension). P-O-R can also accept a fixed length file (with a .txt extension) - this is not a recommended file format unless absolutely necessary. The file must be accessible from your server (the easiest way to get a file on to your server is from a USB thumb drive.)
2. Next, it is recommended that you open the file and review the information that is included. In the example below there are six columns of data. At a minimum the file should include the Part Number, Item Name, Sell Price, and Cost. If there is extra information that is OK; you will only use the data you require.

3. Program Menu, #8 Database Management, Other Updates, Parts Database Import.

4. You can manually type the path and filename or click on the 3 dots to the right of the filename field to open the file selection window.

5. Select the vendor from the pull-down list or choose a new vendor. When you choose 'New Manufacturer' enter the manufacturers name in the box below.
6. Select an Item Category. This will be the category used if and when you add a part to your Point-of-Rental database.
7. Enter the Vendor number. This will be the vendor used if and when you add a part to your Point-of-Rental database.
8. Enter an Item Key Postfix. This is recommended to make sure your Item Keys are unique and not duplicated when two manufacturers have the same part number. (i.e. Add BR for Briggs or ST for Stihl. the Item key would look like this: 123456789BR or 123456789ST).
9. If the first row of your import file has Header information (field labels: part number, sell price, cost, etc...) check the box.
10. Choose the type of file you are importing. (We will not cover fixed length at this time.)
11. Import Prices are in Dollars. If your import file shows the sell and purchase price in decimal format (5.10 = $5.10) check the this box. If they are not (510 = $5.10) uncheck the box.
12. Make a selection for Sell Price.
a. 'From Import File' will use the sell price as defined in your import file.
b. 'Vendor Markup' will use the Vendor Markup Matrix.
c. 'Markup Purchase Price %' will use the cost of the part and the percentage you enter to set the sell price. 200% would make a $10 item sell for $30.
d. 'Markup List Price %' will use the sell price of the part and the percentage you enter to set the sell price. 50% would change the sell price from $10 to $15.
13. Make a selection for Purchase Price.
a. 'From Import File' will use the purchase price as defined in your import file.
b. 'Percent of Sell Price' will use the sell price of the part and the markdown percentage you enter to set the purchase price. 10% would set the purchase price to $9 on an item you sell for $10. You would only use this if your vendor did not include your cost in the import file. This is a way for you to get an estimation of your cost based on the sell price.
14. Column 1 through 20. Map your file to the correct fields in the Parts Database.
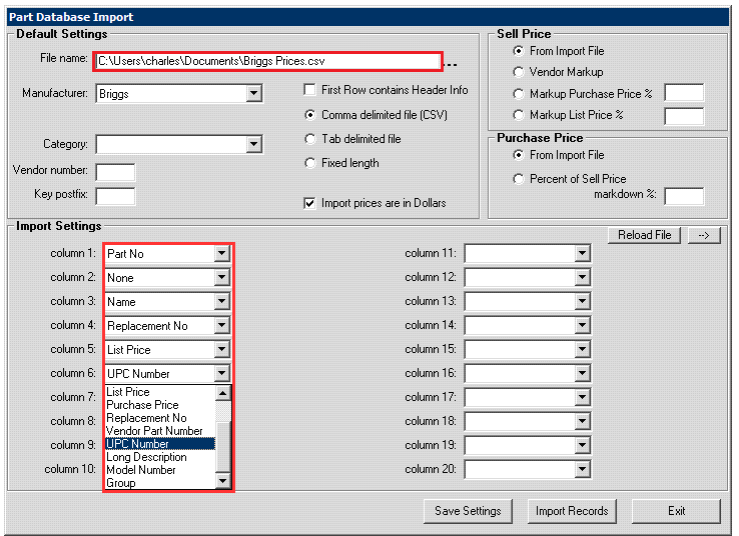
15. As you map each field the data will display to the right of each column field.
16. The --> button in the top right corner allows you to move through each record to verify you have mapped the fields correctly.
17. The Reload File button simply displays the first record in the import file allowing you to move through the file again if needed.
18. After completing this form it is highly recommended that you click the Save Settings button. The next time you select a file with the same filename your selections will be filled in automatically.
19. Click Import Records.
20. 'Update Prices'. If you are updating an existing Parts Database, this option will allow you to update the Sell Price and the Purchase Price of an item that you had previously added to your Point-of-Rental database. Check any or all boxes, if appropriate.
Lastly, you will see a confirmation dialog indicating the number of parts imported, and any errors such as duplicate keys.
Deleting Manufacturers from Part Database Import
1. From Program Menu
2. Select Data Management Module
3. Select Parts Database Import
4. Enter Manufacture
5. Select Alt D
6. It will ask you if you want to delete
7. Select Yes
8. Get out of the program
9. Maunfacture should be gone